I boil it down to 2 simple methods, using basically any equipment. All you really need is a good thermometer.
WHAT IS TEMPERING CHOCOLATE?
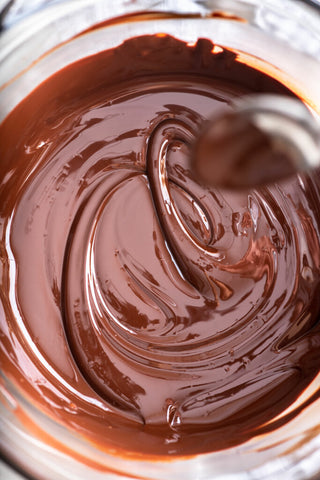
Tempering chocolate is a simple process of melting and cooling chocolate to encourage the formation of one specific cocoa butter crystal while melting away the unstable crystals.
Cocoa butter (the fat in chocolate) can form 6 different crystal structures depending on the temperature.
One crystal form (Form V, also called the beta crystal) is the most desirable and gives the chocolate a smooth, shiny appearance and a snappy consistency. If you simply melt chocolate (above 94°F) and let it cool on its own, the cocoa butter crystals that form will cause the chocolate to be soft and splotchy.
Tempering chocolate is about melting all of the cocoa butter crystals and bringing the chocolate to a specific temperature to encourage the growth of the best crystal.
CHOCOLATE TEMPERING EQUIPMENT YOU CAN USE:
Thermometer: The key to tempering chocolate is to use a good instant-read thermometer.
Microwave: This is my preferred tempering tool. The process is clean, easy, and there’s no potential for water to sneak in and seize the batch. But remember that microwaves work by heating water within the food, and there isn’t much moisture in chocolate. This means it is easy to burn! Go slow and be patient.
Sous-vide: If you love fancy equipment, use a water bath controlled with a sous-vide machine for extra precision. This is an especially helpful tool to keep the chocolate in temper. Just set up a warm water bath at around 90°F (depending on your type of chocolate) and you're good. The cons are the water. Be very careful to not let any water get into the pot. Even condensation on a spoon could drip into the chocolate and seize the batch.
Double- boiler: You don’t need a “real” double boiler. Just set a heat-proof bowl over a saucepan of gently simmering water. This is my least favorite tool for tempering chocolate. I tend to overheat the chocolate and there’s always steam escaping, which makes condensation much more likely to get into the melted chocolate and ruin the batch.
Crockpot: Avoid water altogether and use your crockpot for a gentle way to melt and temper chocolate. Make sure to keep the heat as low as possible!
Heat-proof bowls: I prefer glass, but any heatproof bowl will work. These 8-cup glass measuring cups are my favorite. The handles are especially helpful with all of the stirring required to agitate the chocolate for crystal formation.
HOW TO PERFECTLY TEMPER CHOCOLATE:
Here are two of the simplest ways to temper chocolate at home.
They're based on the premise that good chocolate is already tempered, so we either keep the good crystals (don’t melt them out) or we fully melt the chocolate and use an unmelted portion to seed those good crystals into the melted chocolate.
Keep these principles in mind:
- Respect the temperature curve
- Stir for agitation (encourages crystallization)
- Avoid water
METHOD 1: VERY GENTLE HEAT
The simplest way to temper chocolate at home is to “cheat” the process. Start with great chocolate and don’t mess it up!
- Grate a chocolate bar or finely chop it in a food processor.
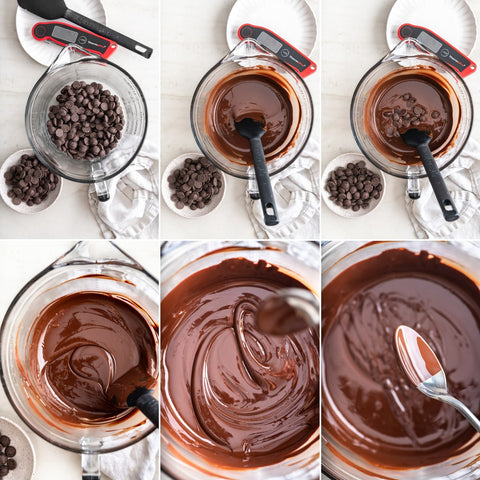
- Barely heat the chocolate in the microwave (20-second intervals at 50% power) until about two-thirds is melted. Don’t let the temperature exceed 94°F.
- Remove from the heat and stir until it’s fully melted. You could also place the bowl on a heating pad to slowly melt it. If the chocolate exceeds 94°F, you’ve lost the good crystals and need to seed with unmelted tempered chocolate (Method 2).
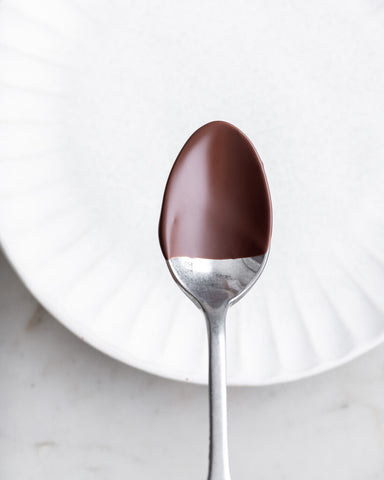
- Test the temper. Dip a spoon in the chocolate and set it aside. Within 2- 3 minutes, the chocolate should set and look evenly matte (not streaky or patchy). You’re in temper!
- Hold the melted chocolate at 90°F and get to work.
METHOD 2: FULLY MELT AND SEED
This is my favorite method: microwave tempered chocolate. I prefer to use a microwave for ease and convenience, but a crockpot, sous-vide, or double boiler are all effective tools.
- Start with chopped chocolate: ½-inch chunks is the ideal size.
- Place two-thirds of the chocolate in a glass bowl and very gently heat until fully melted (see temperatures below). This is easily done in 30-second half-power intervals in the microwave. Don’t exceed 120°F.
- Add some of the remaining chopped chocolate. This will simultaneously cool the melted chocolate and seed it with the right crystals. All of the good crystals will melt above 94°F, so you need some unmelted chocolate pieces present between 90°F- 94°F.
- Cool to the working temperature (see temperatures below) and stir often. Agitation is super important to help the chocolate pieces melt, form the right crystals, and cool down the chocolate. Add more chocolate pieces, as needed, until melted and/ or you reach the right working temperature (see temperatures below).
- Test the temper. Dip a spoon in the chocolate and set it aside. Within 2- 3 minutes, the chocolate should set and look evenly matte (not streaky or patchy). You’re in temper!
- Hold it at 90°F and get to work!
Depending on how much chocolate you have, expect to do 10+ rounds in the microwave to fully melt it. Don't give up and crank the power or time! It's too easy to burn or overheat.
Tip: The closer the temperature gets to 90°F, the harder it will be to melt the chocolate pieces. When you’re in the process, you’ll get a feel for how quickly the chocolate is cooling versus melting, and you’ll have a gut feeling about how many more pieces to sprinkle in. Towards the end, add smaller pieces that you know will be able to melt.
HOW TO KEEP CHOCOLATE IN TEMPER:
If the chocolate gets too cool and starts to set, gently warm it in the microwave (short intervals at half-power). You can also use a heat gun, hair dryer or heating pad to keep the chocolate hovering around 90°F.
Don’t heat it above the max working temperature (see temperatures below), or you’ll melt away the good crystals and the chocolate will lose its temper. If this happens, re-seed it with more tempered chocolate pieces and stir, stir, stir.
HOW TO TEMPER CHOCOLATE WITH SOUS VIDE:
If you have a sous vide machine, this is a fantastic tool for tempering chocolate and keeping it in temper while you work! You can hold it in temper indefinitely! You can use the sous vide to very gently melt the chocolate (method 1) or to melt and seed (method 2).
MELT AND SEED WITH SOUS VIDE:
- Set up a water bath where you can submerge a large 8-cup glass measuring cup or bowl (metal or glass). Try to find something that will fit snugly in your bucket next to the sous vide, or jerry rig a set-up that is mostly secure. We don’t want ANY water to get in the chocolate. It will seize and ruin the whole batch. So the more stable the bowl with the chocolate, the better.
- Set the sous vide to 115°F. Add the chopped chocolate and stir occasionally until melted.
- Once fully melted, drop the temperature on your sous vide to 90°F. Add ice packs to the water and bring it down to 90°F (don't let the water get cooler than 78°F).
- While the water cools, stir in seed chocolate a little at a time. Stir until fully melted, then add a little more. Agitation is important to help the right crystals form.
- Test you’re in temper and proceed!
CHOCOLATE TEMPERING TEMPERATURES:
That’s a mouthful! Basically, we’re talking about the working temperatures for different chocolates.
The temperature at which you melt and cool the chocolate is different for every type of chocolate, even down to the individual producer.
These are the general numbers for each chocolate type, but if you really want to ensure success you can look up the temperature curve.
bittersweet chocolate
- Melting temperature: 115°F- 120°F
- Working temperature: 88°F- 90°F
milk chocolate
- Melting temperature: 105°F- 110°F
- Working temperature: 84°F- 86°F
white chocolate
- Melting temperature: 105°F- 110°F
- Working temperature: 82°F- 84°F
HOW DO I KNOW IF MY CHOCOLATE IS TEMPERED?
Once you’ve gone through the process of tempering, always do a quick temper check before you start dipping your candy.
Simply dip the tip of a knife or spoon in the chocolate and set it aside for a few minutes. Tempered chocolate will set within 2- 3 minutes and continue to harden and get shiny as the cocoa butter fully crystallizes.
A telltale sign of chocolate that is not properly tempered is slow setting. So if you’ve been waiting 5- 10+ minutes for it to set, just accept the fact that it’s not right and restart the process.
- Tempered chocolate sets quickly, but it will continue to crystallize and harden for up to 48 hours after melting.
- Tempered chocolate will be hard, smooth, shiny, glossy and will snap cleanly when broken.
- Non-tempered chocolate will be streaky, dull, grainy, and/ or crumbly. It will quickly melt when touched and may have gray or white bloom on the surface.
- See photos below for a comparison of tempered vs untempered chocolate:
Written by India. If there is any infringement, please contact us.